
So assuming that you’ve created one and started to stock it with data and information – just how do we go about fishing out what we want?
Let’s talk about Azure Data Lake Analytics (ADLA)
In the previous post, I talked about proposed zones in Azure Data Lake Store and how you could get started on populating the lake with raw data. What I want to extend into now is how you could move the data between the different zones (Staging it, Standardizing it, and Curating it) and out to the different consumers.
Microsoft have Azure Data Lake Analytics (ADLA) which is an on-demand analytics job service to simplify big data analytics. In essence, you create U-SQL jobs (expanded on later) and run them, but they can be expanded to a massive scale of data processing without having to make any business logic changes.
This article gives a nice Microsoft marketing speech about things.
In addition to running the U-SQL jobs, you can also create objects in ALDA catalog just like a regular database if you crave structure in your life.
What might it cost?
Well first off we need to think in terms of an Analytic Unit. An Azure Data Lake Analytics Unit, or AU, is a unit of computation made available to your U-SQL job. Each AU gives your job access to a set of underlying resources like CPU and memory. Jobs are submitted to ADLA to do the different blocks of work you want to be done.
So for our pricing scenario we need to think about how many Analytic units we will need to use and how long we need to run them for. As you can see in the below screen shot it is the combination of both of these that drives the cost for ADLA.
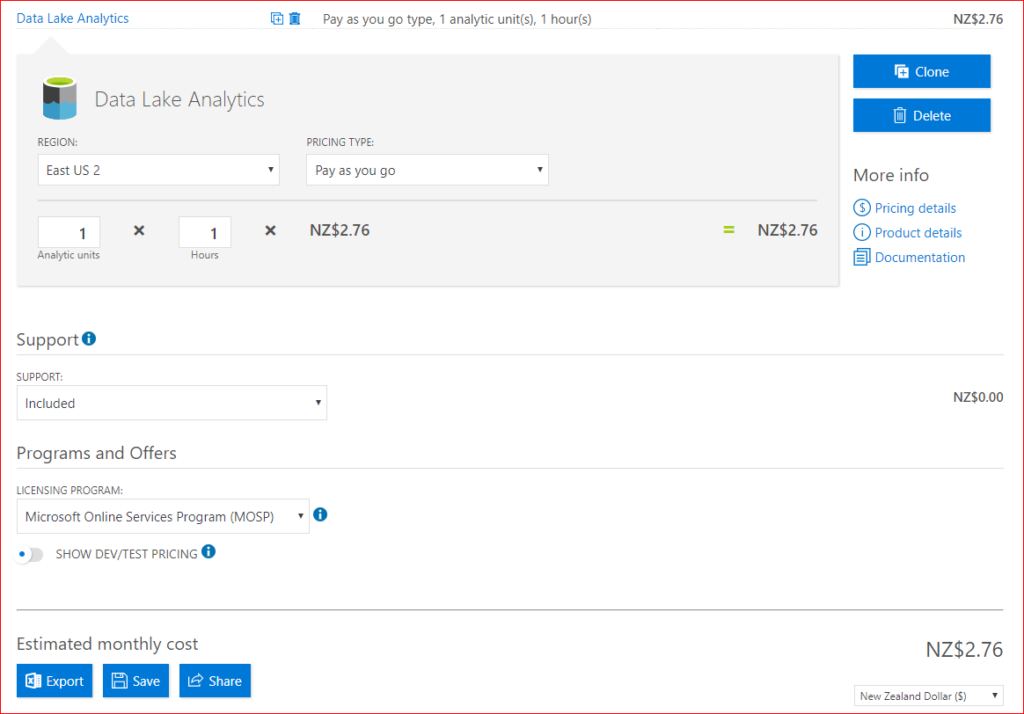
Later on I’ll go into more detail about the job submission process, but you can choose how many AU you throw at things. This gives you the quandary of power vs time – do you throw more resources at something in the hope that it finishes quickly (assuming it’s faster when operated on in parallel) or do you let it do it’s thing in its own time? – your guess is as good as mine (so far).
How do we get started?
Let’s get started by creating an ADLA subscription – this needs to be paired with an Azure Data Lake store account (if you’ve already created one you can use that – assuming it’s in the same region, or you’ll get the option to create a new one shortly).
- Login to the Azure Portal and choose +New.
- Choose the Data + Analytics group and click on Data Lake Analytics.
- Now we get to provide the following attributes:
Name – this will be the name of the service when we want to refer to it.
Subscription – for this situation I’m using my pay-as-you-go subscription.
Resource group – and again I’m going to use the existing one that is associated with my subscription. You can create a new one if you wish.
Location – lets go with the Default of East US 2 (unless you have a reason to use another one).
Data Lake Store – here you can create a new one (see previous post for configuration), or choose an existing one. I chose the one I created in the previous post. - Check the Pin to dashboard box and click on Create.
- Validation and Deployment starts – which will take a few minutes to complete. At the end of it you should have your Azure Data Lake Analytics on your dash board and it may have automatically opened the overview to show you its wares.
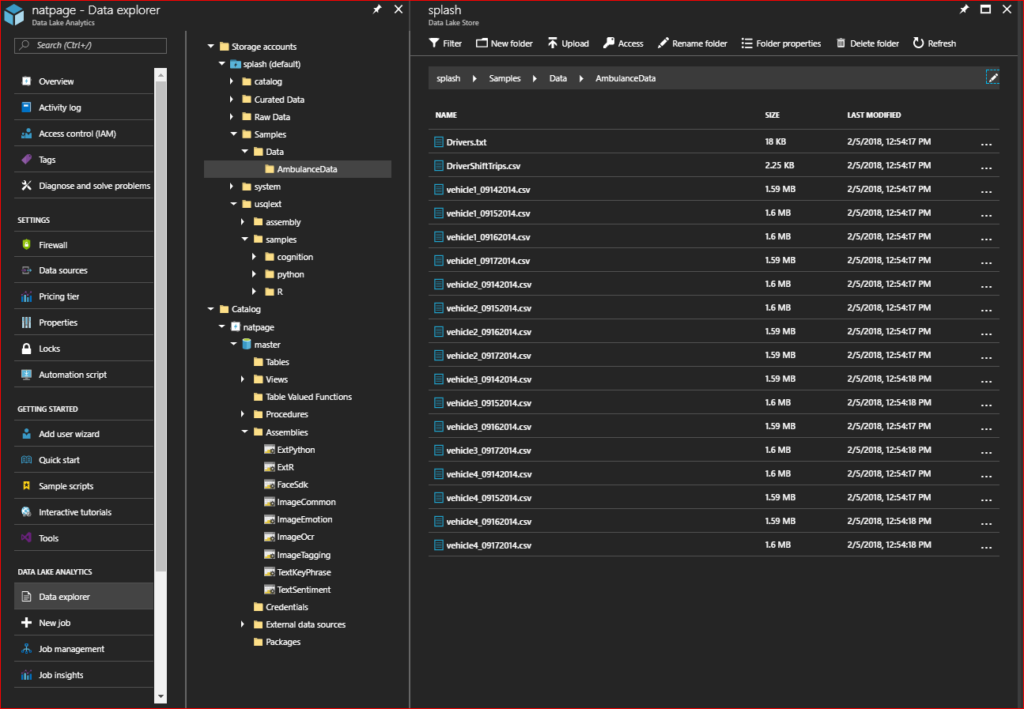
- If you decide to have a look in your Data Lake store you will notice the following new folders (you can also see this in ADLA by choosing the Data Explorer from the overview pane):
catalog – used to hold ADLA database structures etc.
system – used by the U-SQL job engine.
Where to from here?
There is a Getting started section in the ADLA overview. This has some tutorial code etc, and will require you to install a sample data set (50 Mb). There is also the option to install some extension libraries that provide the following capabilities: Scaling out Python scripts with U-SQL, Scaling out R scripts with U-SQL, and Cognitive Capabilities in U-SQL. These take up 2.5Gb and end up as part of the ADLA catalog, and the process of loading may be the first job scheduled as part of your ADLA instance.
What options do we have to work with ADLA?
There are lots! – take a look at the following summary – thanks to http://www.sqlchick.com for this image.

There are two sorts of mind sets that you can take when approaching manipulation and use of data in the azure data lake store:
schema-on-read – is when the consumer (or process) applies structure to the data as it is being read and consumed.
schema-on-write – is when the data has structure applied when its put into a location. This can be done within ADLA by the use of the ADLA Catalog (also known as the U-SQL Catalog) – it provides structured views over the unstructured data, manages structured data in tables and provides a general metadata catalog system to organize your structured data and custom code, secure it and make it discoverable.
The basic concepts present in the ADLA Catalog are:
- Every ADLA account has a single catalog. The catalog cannot be deleted.
- Each catalog contains one or more U-SQL databases.
- Every catalog has a master database that cannot be deleted.
- Each database can contain code and data.
- Data is stored in the form of U-SQL tables.
- U-SQL code is stored in a database in the form of views, table-valued functions, procedures.
- .NET code (.NET assemblies) is stored in the database in the form of U-SQL assemblies.
What’s some examples of what we can do?
Let’s get started with some simple U-SQL work using Visual Studio. Obviously there will be a bit of downloading and set up involved, but one advantage of using Visual studio is that we can use our local development machine to speed up early coding phases or to debug code locally in Visual Studio Code.
Stuff you’ll need to proceed
- Visual Studio: All editions except Express are supported.
- Visual Studio 2017
- Visual Studio 2015
- Visual Studio 2013
- Microsoft Azure SDK for .NET version 2.7.1 or later. Install it by using the Web platform installer.
- Download and install Azure Data Lake Tools for Visual Studio from the Download Center. After installation, note that:
- The Server Explorer > Azure node contains a Data Lake Analytics node.
- The Tools menu has a Data Lake item.
Sample stuff
This follows the tutorial https://docs.microsoft.com/en-us/azure/data-lake-analytics/data-lake-analytics-data-lake-tools-get-started. So I’m only going to touch on the steps in passing as the web page does a much better job of showing the details.
Connect to an Azure Data Lake Analytics account
- Open Visual Studio.
- Open Server Explorer by selecting View > Server Explorer.
- Right-click Azure. Then select Connect to Microsoft Azure Subscription and follow the instructions.
- In Server Explorer, select Azure > Data Lake Analytics. You see a list of your Data Lake Analytics accounts.
Before we do anything further with code development do the following to ensure that we can actually submit our jobs to ADLA.
- Open Cloud Explorer from View>Cloud Explorer.
- Click Account Management button (A person icon on the top)
- Check the corresponding subscriptions you are using or just check “All subscriptions”.
This just makes sure that our Azure subscriptions and data lake stuff are available to us. Otherwise you may be restricted to the local engine on your desktop.
Create a new U-SQL Project and Script file
If you’re familiar with SQL common table expressions (CTE) then the logic used in the script file isn’t a big stretch from what you’re used to:
@a =
SELECT * FROM
(VALUES
("Contoso", 1500.0),
("Woodgrove", 2700.0)
) AS
D( customer, amount );
OUTPUT @a
TO "/data.csv"
USING Outputters.Csv();
It’s simply creating a hard-coded dataset of customer and amount, and then writing it out as a CSV file (in the root folder of the data lake store) via a nice handy Output stream.
Submit the script file to ADLA
At the top of the script file in Visual Studio there is a row of four drop downs. If we ignore the first one for now (labelled Submit) the other three are used to identify:
- Account: A Data Lake Analytics account under your Azure subscription that is needed to compile and run U-SQL jobs. This will be the Data Lake Analytics account you recently created.
- Database: A database under your account. The default is master in the ADLA catalog.
- Schema: A schema under your database. The default is dbo in the master database.
Once you’ve got those set up, click on submit (use the defaults) and off you go.
Checking job results
Everything going well you should get something that looks like the following:
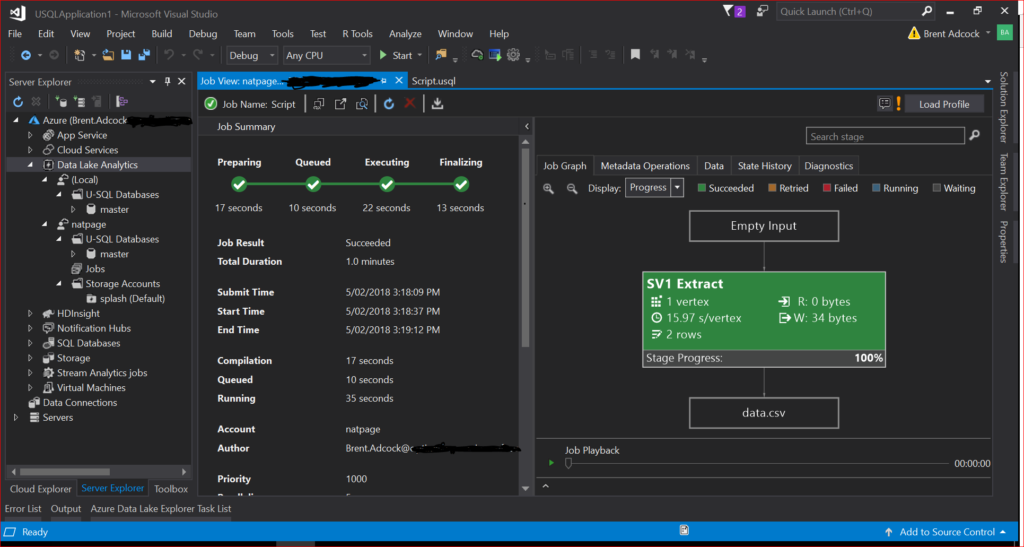
Job done – with a nice amount of detail about it. And if you take a look in your data lake store root folder (using data explorer) you should see the data.csv file that was created. You may be concerned about the time it took to perform a fairly trivial job (shown in the above job summary) – but remember this is a solution designed for terabytes to exabytes of data so it won’t be stunning at a minuscule scale.
Enough simple stuff – show me something interesting
Ok, how about we do something that I promised would be in this post – let’s take some raw data and output some curated data. What we are going to attempt is:
- Load in all of the sample ADLA ambulance data files (you did say yes to installing the sample data set didn’t you) for the four vehicles and different days. There are 16 files in total (e.g. vehicle1_09142014.csv, vehicle2_09162014.csv etc.).
- Aggregate the data to find out how many trips each vehicle did each day.
- Output the summary as a single file to a curated data folder.
The following U-SQL script does all of that for us (i’ll go over the individual parts in more detail shortly):
// First we obtain our raw data from all of the files in the
// sample data directory that match our desired pattern.
@rawData =
EXTRACT vehicle_id int
, entry_id long
, event_date DateTime
, latitude float
, longitude float
, speed int
, direction string
, trip_id int?
FROM "/Samples/Data/AmbulanceData/vehicle{*}.csv"
USING Extractors.Csv();
// Next we perform a simple aggregate to get the number of trips per
// vehicle per day. Since event_date is actually a DateTime we only
// want the date component.
@curatedVehicleTrips =
SELECT vehicle_id, event_date.Date AS tripDate, COUNT(DISTINCT trip_id) AS totalTrips
FROM @rawData
GROUP BY vehicle_id, event_date.Date;
// And then finally we write out the curated result to a summary
// file in our Curated Data zone. We add the %20 for the space
// in the file location as it has to be URI-encoded.
OUTPUT @curatedVehicleTrips TO "/Curated%20Data/Summarized/Ambulance/DailyTripTotals.csv"
ORDER BY tripDate ASC, totalTrips DESC
USING Outputters.Csv(outputHeader:true);
USQL Script Breakdown
@rawData =
EXTRACT vehicle_id int
, entry_id long
, event_date DateTime
, latitude float
, longitude float
, speed int
, direction string
, trip_id int?
FROM “/Samples/Data/AmbulanceData/vehicle{*}.csv”
USING Extractors.Csv();
First things – data types – they are C# data types, not T-SQL ones. The int? data type is shorthand for an integer that accommodates null values (which C# int doesn’t do). In general ? defines whether a data type is nullable or not in C#.
The FROM statement points to the folder on the data lake store where our file(s) of interest are, and the vehicle{*}.csv pattern will only load the files that we want from the folder.
The Extractors.Csv() is a nice handy builtin extractor for loading from flat files – others are Tab separated values (TSV), and Text – you can also write your own custom extractors as necessary. Be warned though this approach requires the files to have the same structure and data types across all of the files. If you are in the situation of dealing with a changing structure (which is perfectly reasonable over a long period of time) then some form of pre-processing of the files into standardized content would be needed.
@curatedVehicleTrips =
SELECT vehicle_id, event_date.Date AS tripDate, COUNT(DISTINCT trip_id) AS totalTrips
FROM @rawData
GROUP BY vehicle_id, event_date.Date;
In the source file(s) the event_date is a DateTime data type, but we want to summarize by date. Because it’s a C# data type we simply ask for the Date component and rename it as tripDate. You may notice that I’m using COUNT(DISTINCT trip_id) to get the total number of trips. That’s because the source file(s) contain multiple GPS records for each trip made by a vehicle.
OUTPUT @curatedVehicleTrips TO “/Curated%20Data/Summarized/Ambulance/DailyTripTotals.csv”
ORDER BY tripDate ASC, totalTrips DESC
USING Outputters.Csv(outputHeader:true);
Our output destination is a new folder (which will be created automagically) and file. Because the file path Uniform Resource Identifier (URI) needs to be URI-encoded I’ve replaced the space in the path with %20. The ordering of the output data isn’t really necessary – it just looks nicer when you view the file. The Outputter is just like the Extractor in that there are three built-ins (TSV, CSV and Text). For this situation, I’m getting it to write out a header row to the file as an example of how you can tweak the output.
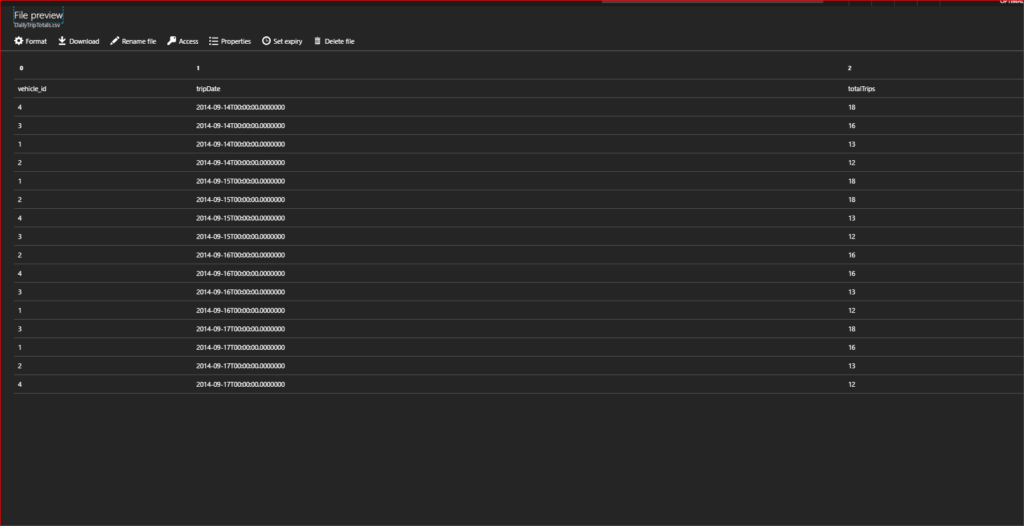
The end output result in the DailyTripTotals file on the Azure Data Lake Store is:
So go forth and enjoy ADLA – my next post will be how we can schedule U-SQL jobs to do this sort of work on a regular structured basis.
Until de next de time – bork, bork, bork.
– Brent
