Power Automate is an online tool designed to make your life easier and more productive. This article will show you how to do this with Excel in a way to get rid of the good old manual copy and paste that is a bane of many peoples existence.
Assumptions and Caveats
Before starting with the guts of the article I’m making the following assumptions:
- You have a passing familiarity with Power Automate (or Flow as it used to be called)
- You have access to the Microsoft Power Platform with an account that can create Power Automate flows.
- You have your excel files in a location that can be accessed by the relevant connectors in Power Automate.
Getting data in and out (maybe shaking it about)
For this article we will primarily be using the Excel Online (Business) connector which allows us to work with Excel files in document libraries supported by Microsoft Graph (OneDrive for Business, SharePoint Sites, and Office 365 Groups).
The documentation for this connector (https://docs.microsoft.com/en-us/connectors/excelonlinebusiness/) is nice and comprehensive and includes a large list of known issues and limitations. From this list here are the ones that have impacted me regularly (and could crop up if you’re reproducing the examples in this article).
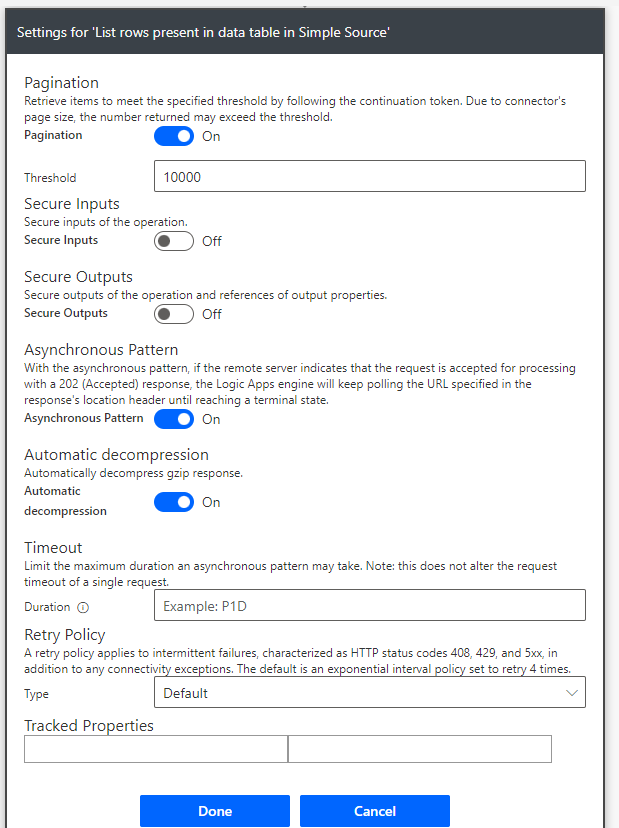
- The List rows present in a table action returns up to 256 rows by default. In order to get all rows, please turn on pagination.
- An Excel file may be locked for an update or delete up to 6 minutes since the last use of the connector.
One main thing to be aware of is that the data we wish to read or write will need to have an Excel data table endpoint. You can’t access data in a named range. So in most cases you’ll need to have done some prep work with your excel files to define the relevant data tables. There is an action available for the Excel connector that allows you to define a data table in a worksheet, but I’m not sure if the defined data table would be recognised in the design phase when attempting to read a row.
Simple Example
The following example shows a straightforward Power Automate Flow that opens a specified excel file, loads in the contents of a data table and then writes out the records to another specified excel file. I’ll go over the individual components in more detail shortly.

Simple Excel Example
When creating this flow I chose the Manual trigger option for it – which is how we get the first action (Manually trigger a flow).
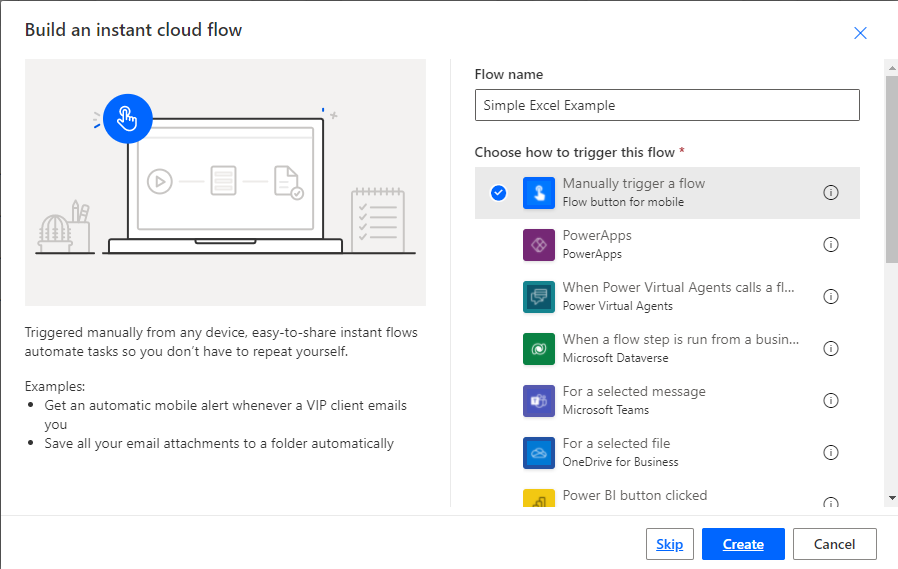
There are a number of different options that can be used to trigger a power automate flow, but this article isn’t going to go into any details – I’ll leave that as further reading.
The next action in the flow connects to the Simple Sample excel file and reads the contents of the Source_Sample data table.
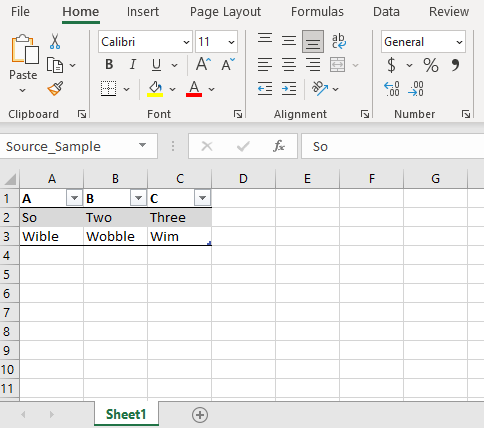
Simple Sample file
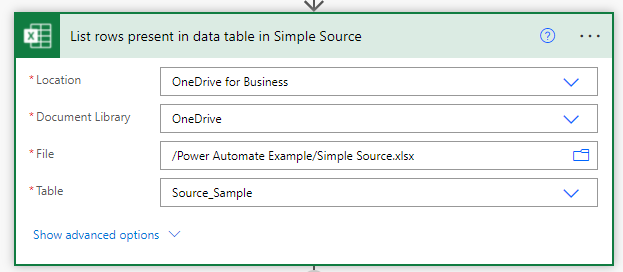
List rows in data table
Setting up the action is quite simple as each choice populates the next field with candidates for selection via the drop-downs.
As mentioned above there is a default limit of 256 rows in Excel connector so in order to increase this limit click on the […] and choose Settings. Enable Pagination and provide a Threshold number that should accomodate the maximum expected number of rows.
The next combined actions write out to a specified Sample destination file. The encompassing action loops through each of the rows of the source dataset and performs the encapsulated action(s). The interesting thing about this action is that it is automatically generated for a dataset when any of its fields are used in an action (such as A, B, or C in the write out action). This can be handy and annoying all at the same time. Handy because each time you add in a field from another (separate) source dataset it will wrap the existing loop with another one. Annoying because it will consistently do it even if there is only one row in the source dataset.
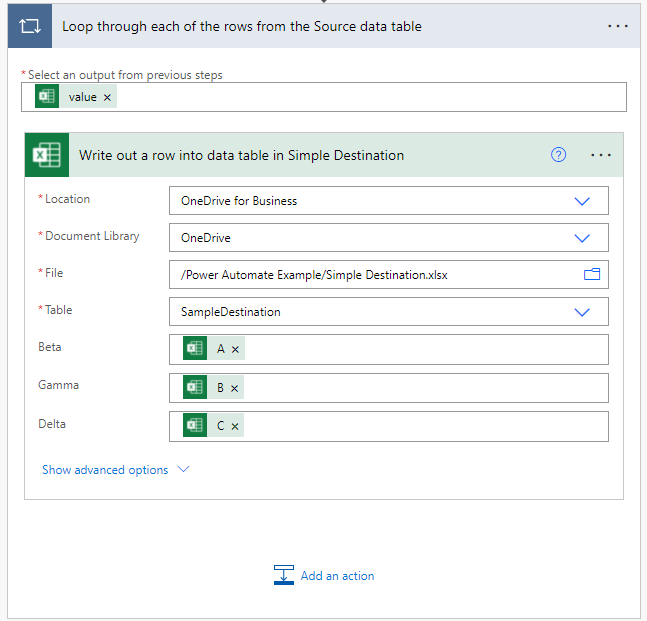
Write out rows to a data table
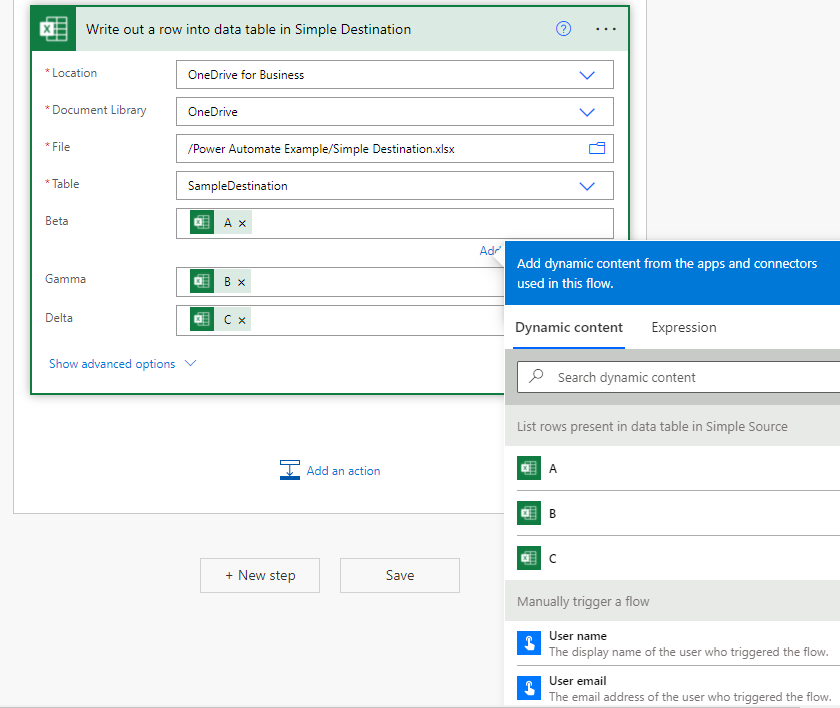
The majority of the [Write out …] action is configured the same way as the [List Rows …] action with an added bonus – once the destination data table has been identified it will list the fields present so that they can be mapped. To do the mapping simply select the destination field and then choose the applicable source field from the Dynamic content popup that appears.
Now to run it – in the design environment choose the Test option from the top right of the menu bar. Select the manual trigger option and click on Save & Test. After that Power Automate will confirm that the Excel Online (Business) connector work for the current credentials and then click on Continue, and then Run Flow. Everything going well we get green ticks across the board and our destination excel file will be populated with the source values.
Making things dynamic – source
So what I’ve shown you so far is nice and straight forward, but what about dealing with a collection of input files, or wanting to generate individual output files from a common source?
Thats when we need to add a dynamic component to the power automate flow, and in order to do that we need a additional connection to file storage where our files are. The following example shows how to create a flow which will loop over excel files in a OneDrive folder, extract the data present (in a data table), and then collate it into a single excel file.

Overview of Dynamic File collator
Going into each of the actions in the above flow in more detail (excluding the [Manually trigger a flow] as its the same as our simple example):
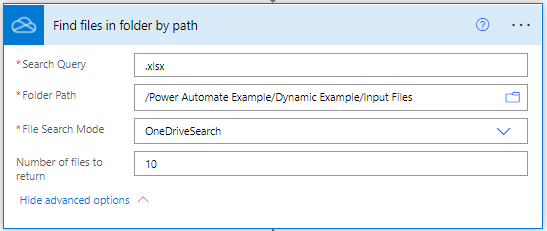
Find files in folder
The first main action is to obtain a collection of the source files that we want to consume. For this example my files are stored in One Drive and there is a handy action that allows us to list all of the Excel files located in a folder. The above properties are pretty self-explanatory – in this example I’ve left the number of files to return at the default value of 10, but obviously you’ll need to scale it to the maximum of files that you can expect to process.
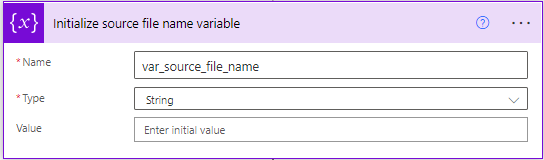
The next action simply initializes a variable to store the name of the source file. If you’re not planning on using the filename for anything then you don’t need it. I’m using it because I’m writing it out to the collated data set.

Reading source files
Having got a collection of source files we now loop through all of them and pull out the contents of the source data table. The data table reader action has one big change from the simple example shown earlier – current file being processed is identified by the dynamic [Id] value from the previous [Find files in folder] action. Why the Id and not the File Name? Good question – it turns out that despite the File property giving all the signs of being a file path value it actually uses the guid of the file in One Drive behind the scenes. Don’t use the Id value when first setting it up though – it’s easier to select a specific source example file (so that the Table value will populate and the output fields are identified) before changing it to the Id value after you’ve done the output mapping (see later on).
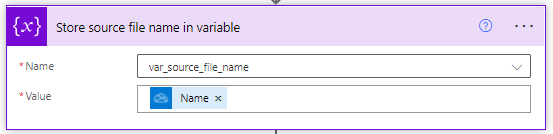
The next action simply stores the current filename that we’re working with so that we can use it later.
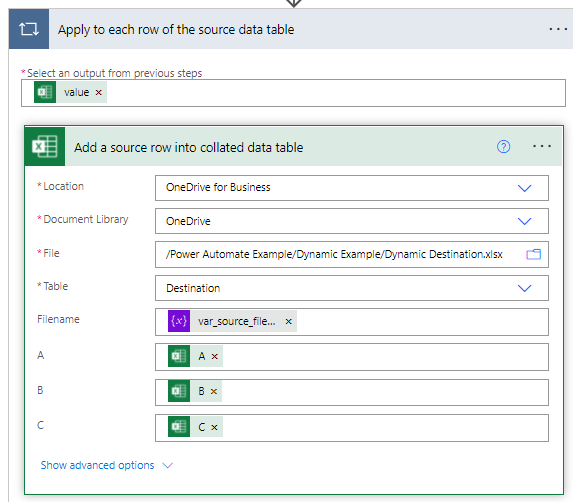
As before with the simple example we pick our destination file and map the source to destination fields. You can see that the filename variable is easily included as well.
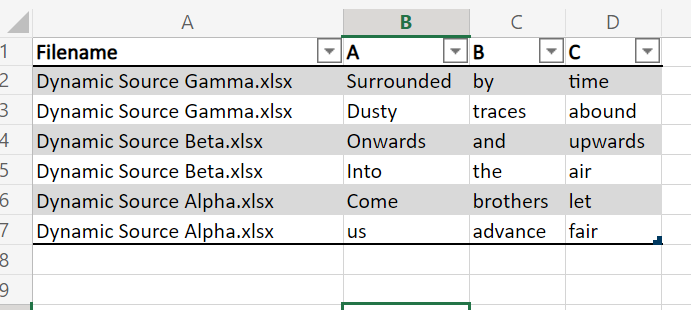
If we run the Dynamic Excel Example we get the following output in our collated file
Making things dynamic – destination
Well thats all good, but what about multiple destination files? That can get a little more complicated but it follows in a similar vein to the dynamic source example. Lets follow the above example but in reverse – we’ll take the collated data file and use it to generate each individual file with its own data table rows.
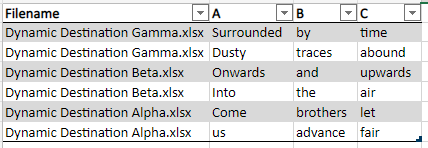
Here’s our starting point (a slightly modified version of the previous output)
And here is a collapsed overview of the Dynamic destination flow which i’ll go through in more detail shortly.
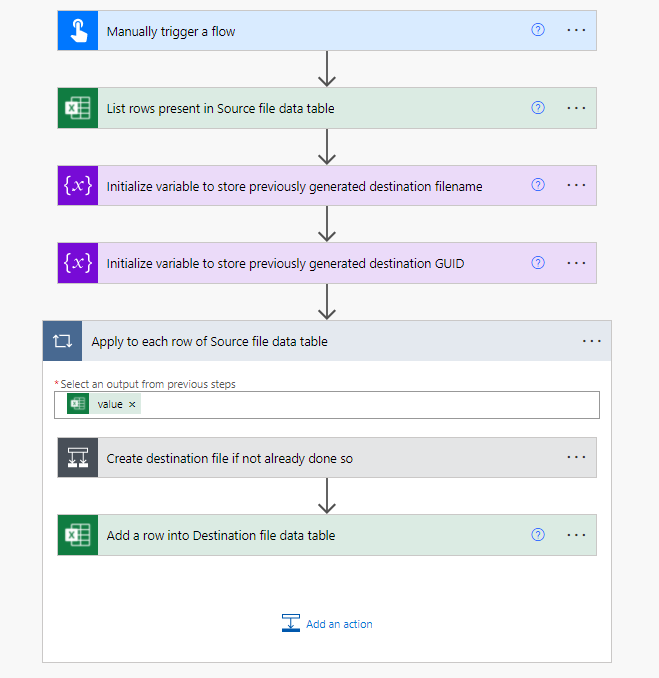
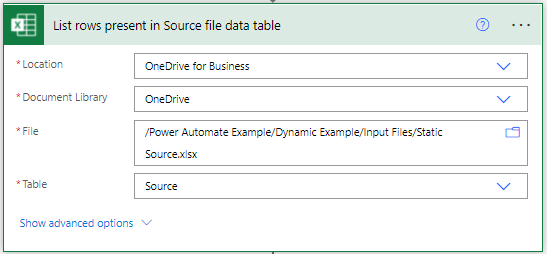
First thing to do is get hold of the contents of our static source file with all of our desired output files and their contents. As mentioned previously there is the default limit of 256 rows in Excel connector so you’ll need to enable Pagination for larger source files.
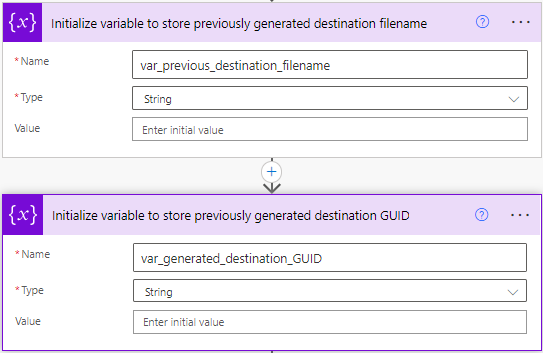
Next we define a couple of handy variables that we will use to keep track of generated destination files.
Now we get onto creating our destination files, but because our sample has more than one row per filename we need to make sure that we only try to generate our destination file once, otherwise we have duplicates or just overwrite it. I’m doing a basic approach where we use a template file (with pre-defined data table) and copy (clone) it to its new destination and filename.
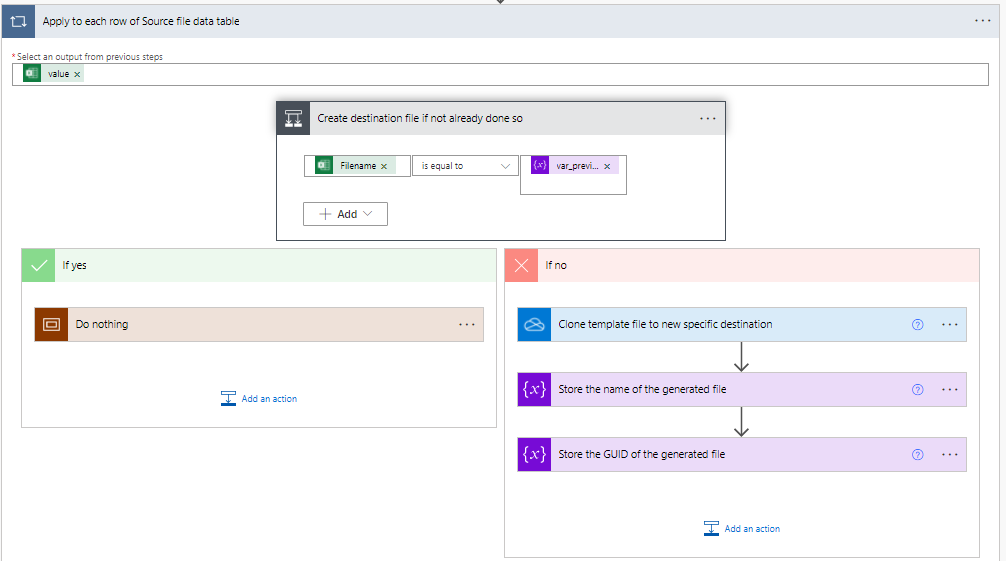
When generating the destination file we make use of everything gone before, and in particular we use the Filename value to construct the Destination File Path, as well as store the value to check if we need to generate a new file.
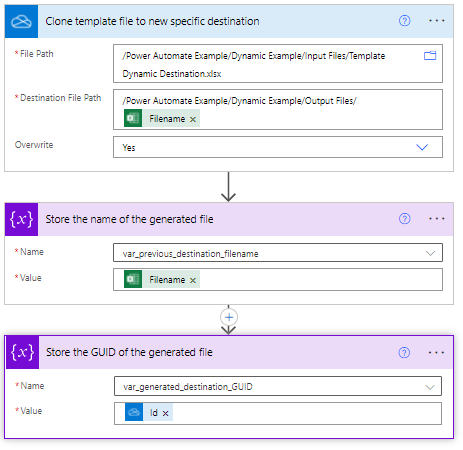
You might wonder why I’m storing the GUID of the generated file – that comes into play in the final action of this flow which is to write out a row of data to our destination file of interest.
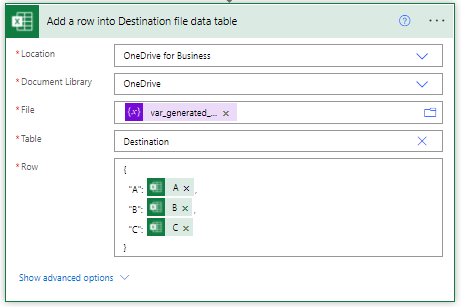
As noted before in the dynamic source example when we are dealing with dynamic files we need to use the ID value rather than the text file path. This is why I use the previously stored variable value because when the If logic determines that we don’t need to create a new file it won’t retain the ID value from the previous loop. Meaning that the value is null for the second row of the output and the action fails.
Another big difference from previous write out examples is the Row field. Where previously each of the destination fields were explicity listed in the interface this is a single field with the fields mapping defined using a JSON style statement. Because the power automate design environment visually simplifies things the actual definition in the Row field is:
{
“A”: @{items(‘Apply_to_each_row_of_Source_file_data_table’)?[‘A’]},
“B”: @{items(‘Apply_to_each_row_of_Source_file_data_table’)?[‘B’]},
“C”: @{items(‘Apply_to_each_row_of_Source_file_data_table’)?[‘C’]}
}
Normally this doesn’t warrant a mention but if you need to manually create the Row value in a text editor then it helps to know the syntax. One thing to be aware of (which is mentioned in the documentation) is that you’ll need to escape the following characters if they are present in a field name:
Character Encoded Value
. _x002e_
@ _x0040_
: _x003a_
# _x0023_
So once we run the flow and everything going smoothly then we get our desired output files, each filled with their relevant data.

And that's as they say in all the good books is that.
