

In my last post I plunged into the Azure pool and created a SQL Database. Now lets do what we always do with a database and start to fill it up. For this post I’m going to concentrate on the Azure Data Factory product and see how it helps us perform ETL (or ELT) goodness.
There are two versions of Azure Data Factory (Version 1 and err.. Version 2) – Version 1 is generally available, with Version 2 being in the Preview state at the moment. I’m going to concentrate on Version 2 for this post as it has a lot more nifty features than Version 1, including the ability to re-use local on-site SQL Server Integration Services (SSIS) packages in the cloud.
Pictures are Good
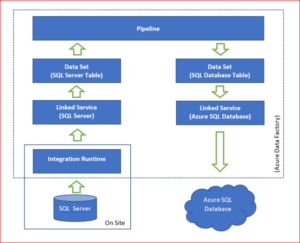
So in keeping with the above statement here’s a quick visual of all of the pieces involved in creating the string between our two cans.
Whats the bits and what do they do?
- SQL Server and Azure SQL Database – Our two cans, the local SQL Server database is the WideWorldImporters sample database and the Azure SQL Database is the one created in the previous post.
- Integration Run-time – this is installed physically on site and is responsible for moving data between on premise and cloud (both ways). You don’t need it if you’re moving between cloud based data storage unless your start/finish is a Azure IaaS virtual machine.
- Linked Service – These define the connection to the data source/sink – if you’re familiar with SSIS think of these as being similar to the Connection Manager entity.
- Data Set – This is a specific named view of data that simply points or references the data you want to use in the pipeline as inputs and outputs. Once again, in SSIS this would be similar to the sources and destinations in the Data Flow Task.
- Pipeline – This is a collection of activities that will perform our desired task – if you’re thinking of SSIS then these would be the equivalent of Data Flow tasks but mashed with the concept of the SSIS package control flow as well.
- Azure Data Factory – This the overarching entity that is responsible for knowing about all of the above bits and getting it all to run together nicely.
More than one way to (well you know the rest)
So continuing the analogy from the title how do we go about creating our piece of string? There are a collection of languages (no GUI – yet…) that can be used to construct the parts in the diagram above.
- .NET SDK
- PowerShell
- Python SDK
- REST API
For the purposes of this example I’m going to work with PowerShell (or Azure PowerShell as you will see).
Failing to prep is prepping to fail
As with most things that require a little of programming/scripting there are a few things that need to be set up/done first. I’ll list these below under their own headings as they can be quite involved.
Install Azure Powershell
Microsoft has a very nice document on how to do this https://docs.microsoft.com/en-us/powershell/azure/install-azurerm-ps?view=azurermps-5.0.0, but if your development machine is like mine you’re probably going to hit the following speed bumps (which are covered by the document in greater detail):
- Install everything as Admin – if you can’t do that then you’ll need someone who can.
- Execution Policies in place for PowerShellGet – these may need modification – examples of what to do are in the document – but again you will need elevated permissions to do it.
- Getting ready to go – Switch to a normal (non-elevated) PowerShell session and import the AzureRM module (Import-Module AzureRM).
Set up tables in SQL Database Destination
Data Factory deals with the movement of data between different states and things, it doesn’t deal with the configuration of things at the two end points. For this example we are planning to copy data between a collection of tables, so we will need the tables to exist in our example SQL Database.
This sounds like a simple thing until you realize that the Azure SQL Database doesn’t behave like a local SQL Server database. For this example the easiest way to recreate the tables in the Azure SQL Database would be to generate the SQL Create Scripts from the local SQL Server database and then (using Management Studio) execute them in the SQL Database. Unfortunately this isn’t as straightforward as it sounds, this article goes into some detail about some of the things that need to accounted for, and in addition I found some others whilst trying to get some example tables to work:
- Geographical and Geometric data types – according to SQL Books online these will work in SQL Database (not in SQL DataWarehouse though) – I wasn’t able to get these working in a straight copy process so I chose some simple example tables that didn’t have any present.
- Foreign Keys – If (like me) you’re testing things out with a sample subset of tables remove any foreign key references to the tables you don’t have (DOH!).
- Computed Columns – WideWorldImporters is a great sample database with a lot of cool bits for computed columns, but if you just want to test the copy process then make the field the same datatype as the computed result.
- File groups and partitioning – No file groups or partitioning – its the cloud man!
Note: There is a handy tool that you can use called the Data Migration Assistant (Download) that will allow you to select the object(s) you want to migrate and it will do a lot of the compatibility issue identification. Having said that, it thought that a lot of the tables that I wanted to migrate were fine until it tried running the scripts. As an aside if you do want to work with SQL Data Warehouse there is a different tool (of course) that does a similar thing (Download here).
Anyway before we proceed further you’ll need to have some sample tables in both of our cans and have data in the SQL Server tables. Now lets look at creating the lovely blue box parts from the diagram.
Create a Data Factory
Logon to the azure portal (https://portal.azure.com) and choose New > Data and Analytics > Data Factory. Once again a form with fields to fill in:
Name – apparently this must be globally unique so stretch that brain.
Subscription – For this example we’re using the one we created in the previous post, which is of course Free Trial.
Resource Group – For this example we’re going to use the existing one that we created for the SQL Database in the previous post.
Version – Select V2 (Preview) for this example.
Location – Currently, you can create data factories in the West US, East US, and North Europe regions. However, a data factory can access data stores and compute services in other Azure regions to move data between data stores or process data by using compute services. Now given that for our previous example we created our sample SQL Database in a different region I will be curious to see what happens around the data transfer. I’m guessing that large transfers between different regions (and out of the cloud to on-premise) would get charged – lets see. For this example I’ve chosen East US – lets pin it to the dash board and click on Create.
If you don’t want to do the only graphical part of the process and stick with Powershell (which everything else will be) then the following code does the same thing as the above process. Where you see <XXX> replace it with with relevant value (this will be the case in the rest of this post).
Login-AzureRmAccount
You’ll be prompted for login details etc. If you have more than one Subscription then you can use the following commands to list them for that login and then select the relevant subscription.
Get-AzureRmSubscription
Select-AzureRmSubscription -SubscriptionId "<SubscriptionId>"
Now you can run the following script to create the Data Factory just like above:
$resourceGroupName = "<Resource Group Name>";
$dataFactoryName = "<Data Factory Name>";
$location = "East US";
Set-AzureRmDataFactoryV2 -ResourceGroupName $resourceGroupName -Location $location -Name $dataFactoryName
So now we’ve got a data factory – whats next?
The next steps are broken down into their own sections – just like the boxes above
Integration Runtime
The steps and sundry involved with installing a self-hosted Integration Run-time are defined in great detail here (https://docs.microsoft.com/en-us/azure/data-factory/create-self-hosted-integration-runtime), so I’ll just summarize things a bit.
- Create an entry for the run time with the Data factory$selfHostedIntegrationRuntimeName = "<Local Integration Runtime Name>"Set-AzureRmDataFactoryV2IntegrationRuntime -ResourceGroupName $resouceGroupName -DataFactoryName $dataFactoryName -Name $selfHostedIntegrationRuntimeName -Type SelfHosted -Description "<Self Hosted IR description>"
- Download and install the run-time executable on local machine (Download here).
- Get an Authentication Key and register the local Integration Runtime with the Data Factory.Get-AzureRmDataFactoryV2IntegrationRuntimeKey -ResourceGroupName $resouceGroupName -DataFactoryName $dataFactoryName -Name $selfHostedIntegrationRuntimeName | ConvertTo-Json This actually gets you two possible keys – copy and past one of them into the Register Integration Runtime (Self-hosted) page of Microsoft Integration Runtime Configuration Manager running on your machine, and click Register.
- Now you may need to resolve proxy, firewall and network issues – the document link above provides lots of trouble shooting advice for that (good luck).
Linked Service
Now we can create our Linked Services for the local SQL Server and the Azure SQL Database. This is where we get funky with JSON files, so make a nice little folder that we can do our work in and create the two following files that define our links for the Data Factory (I’ve used a SQL Login to connect to the sample WideWorldImporters database as I thought its a bit simpler than trying to juggle windows logins).
AzureSqlDatabaseLinkedService.json
{
"name": "AzureSqlDatabaseLinkedService",
"properties": {
"type": "AzureSqlDatabase",
"typeProperties": {
"connectionString": {
"type": "SecureString",
"value": "Server=tcp:<servername>.database.windows.net,1433;Database=<databasename>;User ID=<username>@<servername>;Password=<password>;Trusted_Connection=False;Encrypt=True;Connection Timeout=30"
}
},
"connectVia": {
"referenceName": "<Local Integration Runtime Name>",
"type": "IntegrationRuntimeReference"
}
}
}SqlServerLinkedService.json
{
"name": "SqlServerLinkedService",
"properties": {
"type": "SqlServer",
"typeProperties": {
"connectionString": {
"type": "SecureString",
"value": "Data Source=<Server>;Initial Catalog=WideWorldImporters;Integrated Security=False;User ID=<SQL Login>;Password=<Pwd>;"
}
},
"connectVia": {
"referenceName": "<Local Integration Runtime Name>",
"type": "IntegrationRuntimeReference"
}
}
}
Now we’ve defined what we want our links to look like we need to get them loaded into the Data Factory – the two following PowerShell commands achieve this (make sure you’re located in the nice little folder) :
Set-AzureRmDataFactoryV2LinkedService -DataFactoryName $dataFactoryName -ResourceGroupName $resourceGroupName -Name "AzureSqlDatabaseLinkedService" -File ".AzureSqlDatabaseLinkedService.json"
Set-AzureRmDataFactoryV2LinkedService -DataFactoryName $dataFactoryName -ResourceGroupName $resourceGroupName -Name "SqlServerLinkedService" -File ".SqlServerLinkedService.json"
At this point we’ve just defined our links – the DataFactory doesn’t know what we’re putting through the links, or what direction the data is flowing in. We’ll address that in the following sections.
Dataset
With the links up we can define what we we want to affect on each end of the links. You can explicitly define particular tables, but for this example we’re doing things a little differently. We want to transfer the contents of a collection of tables which will be determined by a query against the source system.
In order to make this work for our Dataset we need a dummy value to act as a table name placeholder in our script. Let’s start with what is our planned source (everything is JSON files and PowerShell from here on):
SqlServerDatabaseDataset.json
{
"name": "SQLServerDatabaseDataset",
"properties": {
"type": "SqlServerTable",
"linkedServiceName": {
"referenceName": "SQLServerLinkedService",
"type": "LinkedServiceReference"
},
"typeProperties": {
"tableName": "dummy"
}
}
}
Now because our destination data set is unknown at this stage we need to parameterize the name of the table; the below JSON script shows how you do that.
AzureAqlDatabaseDataSet.json
{
"name": "AzureSqlDatabaseDataset",
"properties": {
"type": "AzureSqlTable",
"linkedServiceName": {
"referenceName": "AzureSqlDatabaseLinkedService",
"type": "LinkedServiceReference"
}, "typeProperties": {
"tableName": {
"value": "@{dataset().DWTableName}",
"type": "Expression"
}
},
"parameters":{
"DWTableName":{
"type":"String"
}
}
}
}
Just like the links above we now need to load these definitions into the Datafactory – the two following PowerShell commands achieve this:
Set-AzureRmDataFactoryV2Dataset -DataFactoryName $dataFactoryName -ResourceGroupName $resourceGroupName -Name "SQLServerDatabaseDataset" -File ".SQLServerDatabaseDataset.json"
Set-AzureRmDataFactoryV2Dataset -DataFactoryName $dataFactoryName -ResourceGroupName $resourceGroupName -Name "AzureSqlDatabaseDataset" -File ".AzureSqlDatabaseDataset.json"
Pipeline
Referring to the boxy picture above we only have the last piece of the puzzle left and that’s the Pipeline that ties it all together. Now at this point I should explain that we are actually going to create two pipelines, but they both conveniently slot together. The below picture best explains what we’re aiming to do:

So how does this look in JSON code? First our controller pipeline (Pipeline 1):
GetTableListAndTriggerCopyData.json
{
"name":"GetTableListAndTriggerCopyData",
"properties":{
"activities":[
{
"name": "LookupTableList",
"description": "Retrieve the table list from the SQL Server database",
"type": "Lookup",
"typeProperties": {
"source": {
"type": "SqlSource",
"sqlReaderQuery": "SELECT TABLE_SCHEMA, TABLE_NAME FROM information_schema.TABLES WHERE TABLE_TYPE = 'BASE TABLE' AND (<Logic to identify desired tables>)"
},
"dataset": {
"referenceName": "SQLServerDatabaseDataset",
"type": "DatasetReference"
},
"firstRowOnly": false
}
},
{
"name": "TriggerCopy",
"type": "ExecutePipeline",
"typeProperties": {
"parameters": {
"tableList": {
"value": "@activity('LookupTableList').output.value",
"type": "Expression"
}
},
"pipeline": {
"referenceName": "IterateAndCopySQLTables",
"type": "PipelineReference"
},
"waitOnCompletion": true
},
"dependsOn": [
{
"activity": "LookupTableList",
"dependencyConditions": [
"Succeeded"
]
}
]
}
]
}
}
So how to decipher this? There are two activities in this script – the first (LookupTableList) is going off to the SQL Server source/data set and obtaining a full list of the tables (with schema names) that we want to copy. The second activity (TriggerCopy) knows that it has to wait for LookupTableList to succeed before starting and then feeds the collection of table names and schema to the second pipeline (IterateAndCopySQLTables) which it waits on to complete. Whats our second pipeline (Pipeline 2) look like?
IterateAndCopySQLTables.json
{
"name": "IterateAndCopySQLTables",
"properties": {
"activities": [
{
"name": "IterateSQLTables",
"type": "ForEach",
"typeProperties": {
"isSequential": "false",
"items": {
"value": "@pipeline().parameters.tableList",
"type": "Expression"
},
"activities": [
{
"name": "CopyData",
"description": "Copy data from SQL Server to SQL Database",
"type": "Copy",
"inputs": [
{
"referenceName": "SQLServerDatabaseDataset",
"type": "DatasetReference"
}
],
"outputs": [
{
"referenceName": "AzureSqlDatabaseDataset",
"type": "DatasetReference",
"parameters": {
"DWTableName": "[@{item().TABLE_SCHEMA}].[@{item().TABLE_NAME}]"
}
}
],
"typeProperties": {
"source": {
"type": "SqlSource",
"sqlReaderQuery": "SELECT * FROM [@{item().TABLE_SCHEMA}].[@{item().TABLE_NAME}]"
},
"sink": {
"type": "SqlSink",
"preCopyScript": "TRUNCATE TABLE [@{item().TABLE_SCHEMA}].[@{item().TABLE_NAME}]",
"writeBatchSize": 100000
}
}
}
]
}
}
],
"parameters": {
"tableList": {
"type": "Object"
}
}
}
}
And the plain english interpretation is as follows. The pipeline is expecting an input parameter called tableList, it then performs an activity for each object in the supplied parameter. This is where DataFactory can shine because with isSequential = False it means that instead of looping through our list of tables it will run all of the copy operations in parallel. The CopyData activity knows that it’s getting an input from SQLServer and is outputting data to the Azure SQLDatabase table specified by the tableList parameter. The typeProperties entry explicitly states that when getting data from the SQL Server we want everything from our table of interest, and when delivering it to the SQLDatabase table we want to empty it out prior to re-populating it (that’s the Truncate table part).
Once again these pipelines won’t actually be able to do anything until we associate them with our Data Factory. The Powershell scripts for this are:
Set-AzureRmDataFactoryV2Pipeline -DataFactoryName $dataFactoryName -ResourceGroupName $resourceGroupName -Name "GetTableListAndTriggerCopyData" -File ".GetTableListAndTriggerCopyData.json"
Set-AzureRmDataFactoryV2Pipeline -DataFactoryName $dataFactoryName -ResourceGroupName $resourceGroupName -Name "IterateAndCopySQLTables" -File ".IterateAndCopySQLTables.json"
So that’s everything set up – all that’s left to do is…
Take a deep breath and
Lets execute our pipeline. Because the GetTableListAndTriggerCopyData pipeline is the controller that’s the one we want to kick off. This is as simple as running the following PowerShell script which starts up the pipeline and then returns to the command prompt.
$runId = Invoke-AzureRmDataFactoryV2Pipeline -DataFactoryName $dataFactoryName -ResourceGroupName $resourceGroupName -PipelineName 'GetTableListAndTriggerCopyData'
Now because it returns without error it doesn’t mean that the Pipeline has succeeded – it only means that the Data Factory succeeded in starting it. To see how things are going the following script will loop around checking in with the Data Factory until the run completes.
while ($True) {
$run = Get-AzureRmDataFactoryV2PipelineRun -ResourceGroupName $resourceGroupName -DataFactoryName $DataFactoryName -PipelineRunId $runId
if ($run) {
if ($run.Status -ne 'InProgress') {
Write-Host "Pipeline run finished. The status is: " $run.Status -foregroundcolor "Yellow"
Write-Host "Pipeline run details:" -foregroundcolor "Yellow"
$run
break
}
Write-Host "Pipeline is running...status: InProgress" -foregroundcolor "Yellow"
}
Start-Sleep -Seconds 15
}
Hopefully everything goes well and the output status is Succeeded. If it isn’t then you’ve got to try and troubleshoot – which can be fun. Sometimes the failure reports back with an error message that outlines the problems and sometimes there’s nothing returned. In that case the next place to go looking is in the logs for the Integration Runtime (since it’s been doing the heaving lifting) – Go to the Diagnostics tab in the Microsoft Integration Runtime Configuration Manager and click on View Logs. This will open up the log viewer for the local machine and show you any issues it had.
Anyway once things are running and succeeding you can verify that everything was transferred successfully by checking the contents of your SQL Database – lots of options for this – I prefer SQL Server Management Studio, or the online tools in the Azure Portal.
Other types of String
Now there’s always more than one way of doing things and I fully admit the way I’ve just shown you may not be appropriate for your end goal. The following article by Robert Sheldon (https://www.red-gate.com/simple-talk/cloud/cloud-data/using-ssis-to-load-data-into-azure-sql-data-warehouse/) brilliantly outlines the different techniques available for transferring data into and around Azure (using a SQL Data warehouse example) before choosing a simple SSIS approach for a simple one-off pump and dump.
If you want to read further on the goody goodness of Data Factory then https://docs.microsoft.com/en-us/azure/data-factory/ is the place for you – try not to get lost – there’s a lot of stuff there.
Until de next de time – bork, bork, bork.
Image Source: RyanMcGuire / Pixabay
